Sunday 8 October 2017

                         Cauldron Of Colours


The excitement of Inktober, Halloween and the release of Jane Davenports new Mermaid Markers has me all inspired. 

I wanted to create some fabulous colours that would work well for not only the INKredibleTober Challenge, but for my journal pages I create in the future. ( You can join in the fun over on Jane's Mixed Media Workshop Facebook Group.)

So, after nearly fainting over the delicious new range of colours, especially the shimmers, I got to Mixing and the following "recipes" are what I have come up with....so far. 

I  blended most of the colours on a palette, but also tried mixing or layering directly onto the page. 
I think for the best effect, mixing on the palette worked for me.

I played with different ratios. It is amazing what variations of intensity and colour you can get from playing with them like this. 

It's difficult to measure or give you an exact ratio for each one, but as you will see from the pics, you can create a lovely variety of shades from the one colour combination. 


The following colours were all created using the newly released Mermaid Marker:

Sunbleached.  Conch, Seashell, Sand Bar, Lagoon, Bali Blue and Driftwood

Shipwrecked. Kelp, Squid Ink, Stormy Seas, Shark's Eye, Octopus and Gills

Shimmering Sky. Milky Way,Aurora Australis, Polar Lights andPlanet Gliese

Celestial Sky. Meteorite, Moonbeam, Black Whole and Falling Star


I first started out wanting to make some shimmery pumpkin shades and after playing with these three colours, I was able to mix quite a variety. 

As you can see in the following image I used Sand Bar, Falling Star and Polar Lights.
Each colour was made experimenting with the ratios.

Pumpkin Spice.
I used more of the Sand Bar to mix this shade.
The key at the top f the following page show the colours needed to get mixing your Pumpkin Spiced shades.


Sand Bar, Falling Star and Polar Lights. 

I thought about what other colours remind me of Halloween and Purples came to mind. Perfect for a shimmery witches cloak or a dramatic gothic gown.
The shades of purple that can be mixed is amazing. 
I used Octopus, Squid Ink and Polar Lights for these recipes. 

Octopus, Squid Ink and Polar Lights were used in different
ratios to create these s fabulous summery shades or purple. 

You can see how the amount of Pink ( Polar Lights)
Red ( Octopus) and blue ( Squid Ink)
really affects the tone of the purple.

 
When I think of Halloween, I definitely think of bats, ravens, witches  graveyards at night. 

The following colours remind me of these things. 
I threw a good splash of Milky Way, a dash of Sharks Eye, Black Hole and Meteorite into the cauldron and here we have it. Some deep dark colours bubbled out. I hope you enjoy mixing some of your own variations on these shades. 


Milky Way and Sharks Eye were mixed to create the deep rich shimmery black. 
Milky way and Sharks Eye ( heavy on the Milky Way) created the shimmery" Ravens Feather" colour as I like to call it. 
And to create the "Gravestone Grey", use a mix of Black Hole and Sharks Eye, then add a top layer of Meteorite over that. 


Milky Way, Sharks Eye, Black Hole and Meteorite.

Of course Halloween wouldn't be complete without a with or two with their glowing green skin, slime, slippery frogs, toads and shimmering Dragon scales to toss into their cauldrons. 

To whip these colours up you will need Kelp, Falling Star and Sand Bar. 

For my first recipe mix Kelp and Falling Star together, again changing up the ratios till it's mixed to your taste. 


Kelp and Falling Star

Left to right: Sand Bar and Aurora Australis
Aurora Australis and Falling Star
Kelp and Falling Star


Sand Bar and Aurora Australis


                                Kelp and Falling Star


Not wanting to waste any of the fabulous green I mixed, I used the last of it with a good splash of water on  a blank page and  watched as the colours pooled and separated. 

Kelp and Falling Star and a good wash of water. 


Now, every recipe book usually ends with all things sweet and these colours remind me of candy and fairies These are the simplest of all of the recipes and really only need two ingredients. 
The colours from the Sunbleached set and Moonbeam from the Celestial Sky set. 

You can see how the Moonbeam pastelises the colours, making them transform into pretty shades of candy, frosting and fairies wings etc. 

From left to right: Lagoon, Driftwood, Seashell, Bali Blue, Conch, Moonbeam And Sand Bar.
(I apologise for the mix up with the Sand Bar mix being at the top of the page. I forgot the Sandbar mix and had to add it to the top, above the Moonbeam swatch.)
Well, I hope you enjoyed these recipes and you get cooking up a storm with your Mermaid Markers as well. I'm sure there are plenty more recipes to be created yet. 
Time to pull out our cauldron and get cooking. 


                                      Wishing you a wonderfully arty day. 
                                                 Kerry Sinigaglia
                                                                 XOX


Tuesday 14 February 2017

Washi your Face

                                  Washi Your Face

Hello everybody. 
This year has started off with some wonderful things happening for me. I am so thrilled to be Jane Davenport and her lovely  husband, Angus' little helper. 
If you're a Davenpeep, you've probably seen or heard from me quite a bit in Jane's Facebook groups.

I am also enjoying all of the art shared in these groups and playing with Jane's very own mixed media art supply range brought out in JANEuary. I've been having a ball playing with all of her art supplies myself, and, as I'm about to share with you all, I had a wonderful crafter-noon recently when I created my 'face spinner' with Jane's wish tapes in her Butterfly journal. So..........if you'd like to make one of your own, here's what you will need and a 'how to' create your very own. I hope you have fun. 

SUPPLIES: 
JDMM "Miss Match" washi tapes
JDMM Paper Pad 2 pages
JDMM Butterfly Journal/optional
Sizzix die cutting machine
Sizzix "picture wheel" die , or a viewfinder cartridge to use as a template. 
pencil
craft knife
needle like piercing tool
scissors
white card stock ( or your choice of colour) 
small brads
ruler
double sided tape or glue stick


Step 1:  
Draw around your 'picture wheel' and mark out the windows. 


Step 2:

Tear the individual images from the washi roll and place over the windows you marked out. 

Step3:
Cut out your 'swimsuit girl' from the cover of Jane's Paper Pad.

After cutting out the image from the front page of Jane's Paper Pad, use a die cut from your 'picture window' die  and trace out the face ready for cutting out. 
 

Step 4:
Make another picture wheel from your card stock to glue over the faces wheel you've created. 


Step 5:
Once glued together, using a needle like tool,  pierce the centre of the wheel in the BACKING page making sure the window cut out is aligned. 
Mark out the hole in the centre of the chosen paper pad BACKING page once folded in half. Fold the flap of the FRONT page over at the top to fit into the Butterfly journal. This gives you a smooth 'spinning' wheel' hold. 
NOTE: Jane's paper pad pages are a little larger than the inserts which allow for a fold over at the top. Also, make sure that you  allow the tip of the picture wheel to hang out at the side a little in order to allow for spinning as shown below. 
Trace out the window which should be centred at the top of the  FRONT page for cutting out. Once you cut out that window, align your swimsuit girl with her face window cut out so as you spin the wheel, all ace are visible.


Step 6:

Use the brad to secure the picture wheel to the BACK page.
Here's what it should look like. 
Picture wheel in-between the  FRONT folded page and a BACK page. 


Step 7:

SO. once the picture wheel is secured, the faces line up with the front girls face window, you can secure the pages together with more of Jane's washi tapes. 


Step 8:

Here's how she should look. 


I hope you've enjoyed this crafty spin on using Jane Davenport's mixed media range, and I hope you too can create one of your very own. 

Till next time

XOX

Kerry Sinigaglia


Wednesday 9 November 2016

Airbrush tips #2 The Full video


Hi everyone. It's been quite a while since I shared on my blog, but, I'm back with renewed verve, and I hope to be blogging a lot more about art supplies and creative ideas. This little video was my first attempt at creating a tutorial for Youtube. I hope that you enjoy it, and that some of the ideas and cleaning tips are helpful to you.


Till next time
Stay creative.

xox


   Kerry Sinigaglia

Friday 27 March 2015

Pretty Platters with Pèbèo Porcelain  150


I know that's a tongue twister, Try saying it 5 times quickly.
Seriously though, I loved creating these and I cans see that the options are endless. 

To create your own pretty platters to impress you friends you'll need…

Porcelain dishes of choice
Pèbèo Porcelaine 150 markers
Pebeo fine point black (0.7mm)paint pen
regular 6B pencil
Porcelaine 150 Brilliant paint in Scarlet and White
Sharp object to remove and sharpen lines
paintbrush
Rubbing alcohol and cotton buds

So lets get started


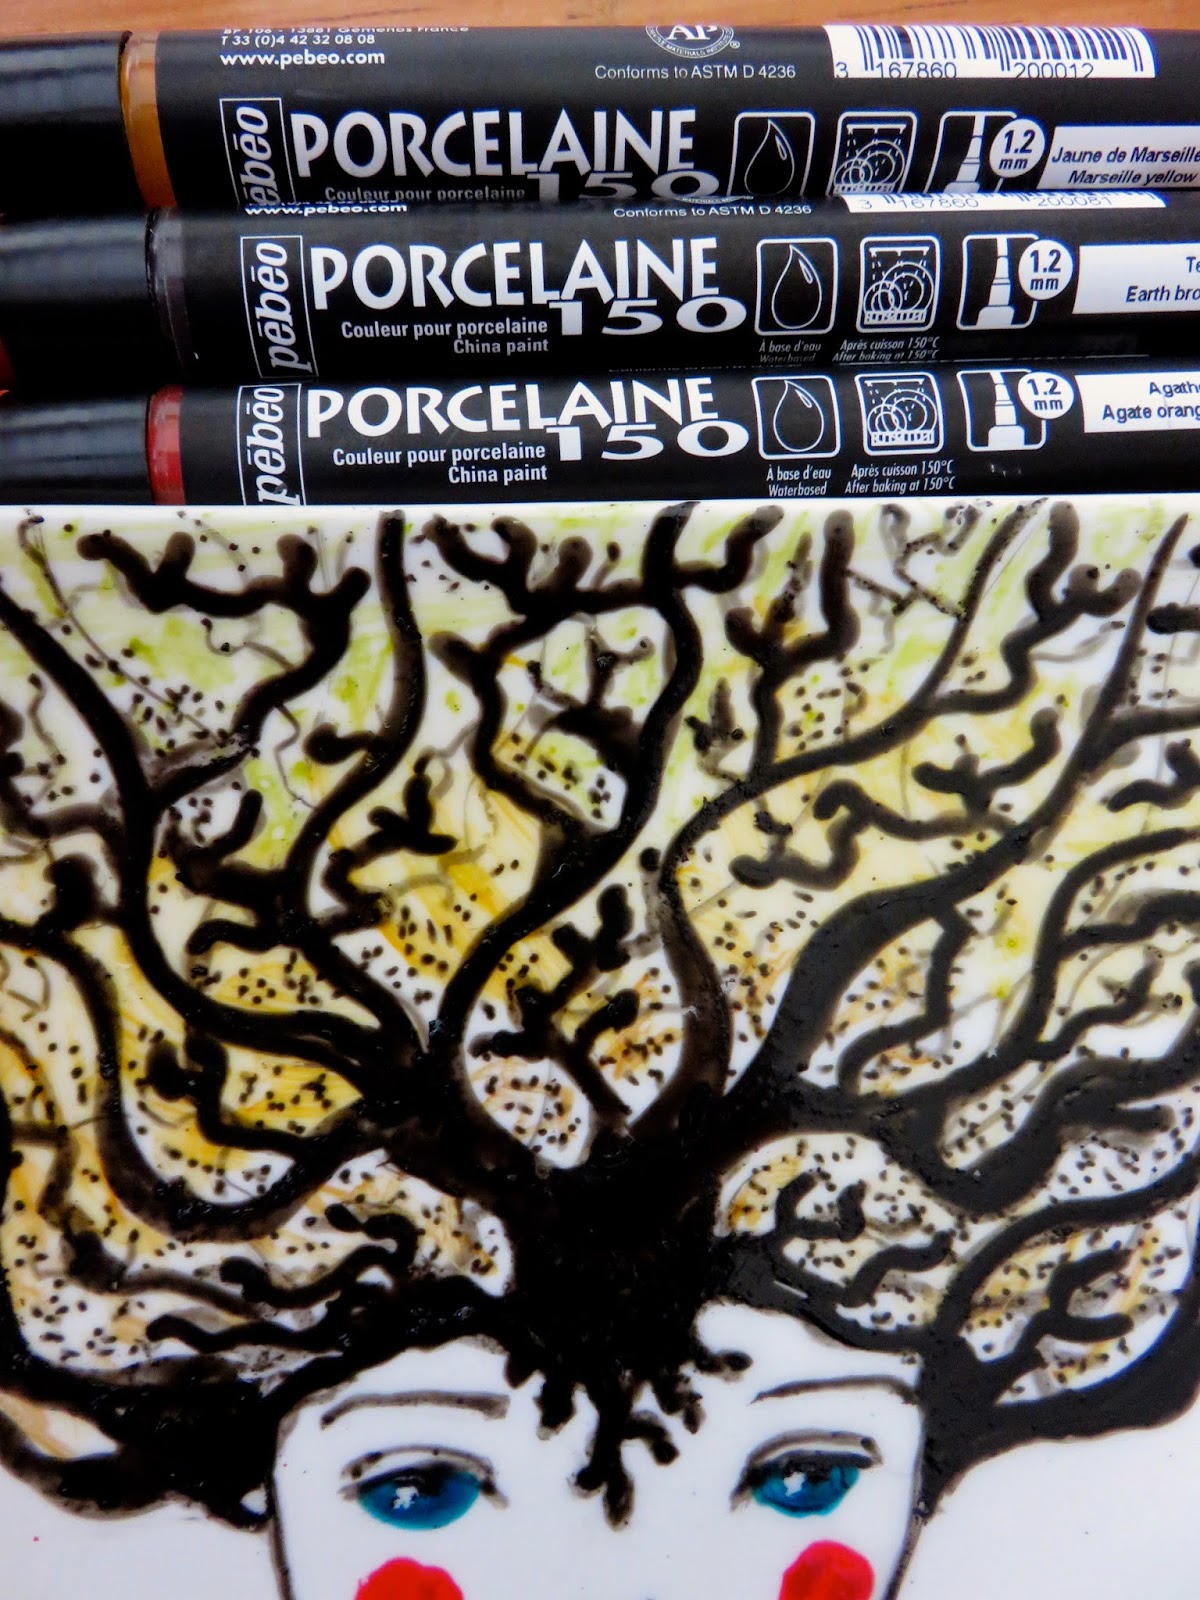
I drew a face on the platter freehand. It's so easy to wipe off and correct if you aren't happy with it. When you have the look you want, begin outlining with the black porcelain paint pens in the 1.2mm and 0.7mm 


Decide how you want to create the 'hair'. My first design kind of set the tone for the organic look.Adding random lines in various thicknesses, I created 'branches' and then dots to add a kind of shadow. The eyes are simply a dab of Peacock Blue and the lips and cheeks are scarlet red.


Add the Peacock blue to the top of the colour area and blend out with your fingers.


Starting with Earth Brown at the base and blend with your fingers. Go lighter as you move up. I used Marseille Yellow,, Agate Orange and Peridot Green blending colours as you work.


Finally, a touch of Peacock blue added to the top and some of the golds at the bottom help balance the look.  
Allow the paints 24 hours drying time before baking in your oven for around 35 min at 150ºC

Now you are free to create your set of platters. 
I did sharpen the lines up and added the highlight in the eyes by 'scratching' off any untidy or messy lines. A wooden skewer of sharpish tool will work. A quick sip over with some rubbing alcohol with a tissue or a cotton bud does the job of cleaning up.


Heres a quick glimpse of some of the other platter designs. 
I did use the Porcelaine 150 paints from the little jars in these.  Mixing a little Scarlet red and white to get the varied pinks for the floral hair. 
After adding a Peacock blue base, I softened it off by dabbing some watered down White. 
Keep playing till you're happy. And most importantly, have fun with it. 


 Now you're set to impress.

Time to invite you friends around for a cuppa and serve them their favourite treat on what is sure to be the talking point of your get together.Your personalised platters. 

Enjoy
Cheers
xox
Kerry Sinigaglia

Monday 23 February 2015

Two faced Tessie

O.k. I think I have a serious case of Pebeo-istis. Once you've got it, there is no cure. And I am totally fine with that. Today I'll be sharing with you some of the conditions to look out for.
  1. trouble sleeping due to so many ideas buzzing in your head
  2. A highly contagious grin from all the fun you're having
  3. A sense of sadness when you aren't creating
  4. an insatiable desire to paint on anything fabric
  5. spots……of paint  on your hands
  6. loss of appetite . There's no time to eat.You're too busy painting things

Here's what I created to get you started on your own case of Pebeo-itis.

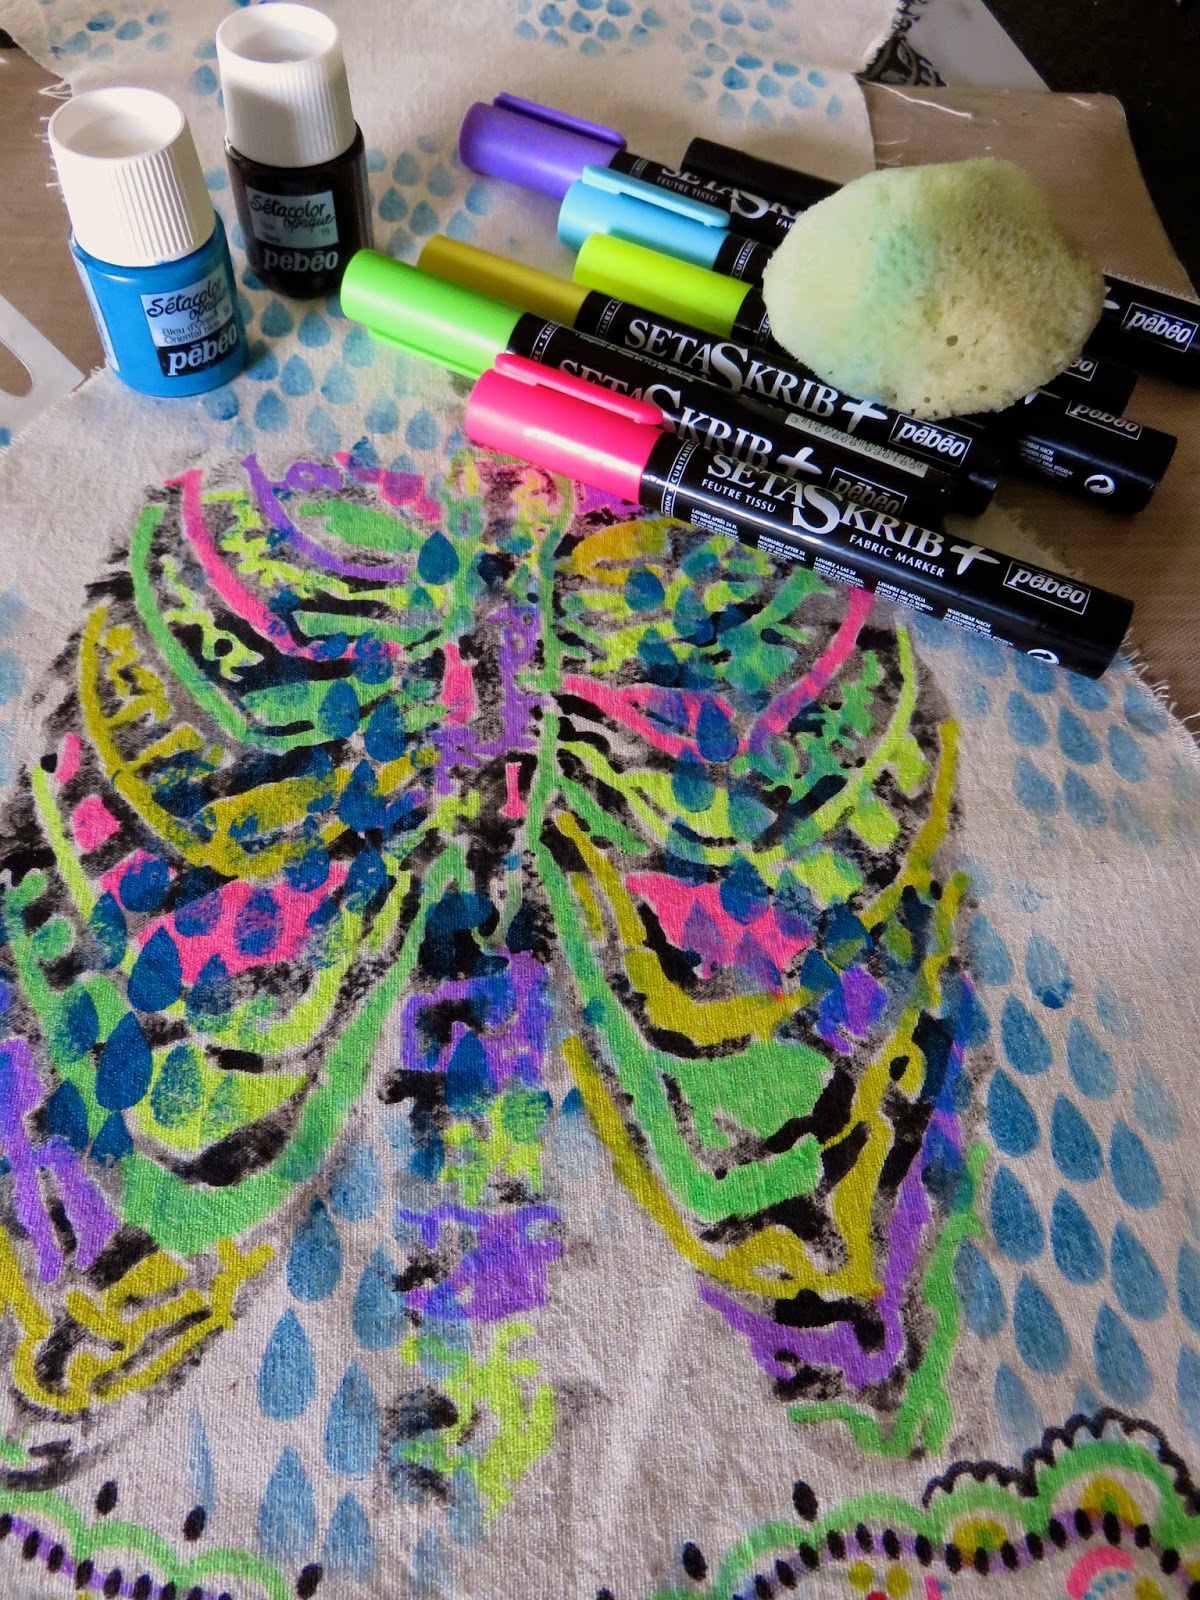
Supplies for this project: Pebeo Sétacolor Opaque fabric paints Discovery Set, Pebeo SetaSkrib fabric markers  6pack of original and fluorescent, calico, chalk marker, Gesso, Schmincke Aero Color acrylic ink, Princeton artist brushes and silicon brush, Canson 'basix' art sponge, water spray bottle, stamps, stencils, Archival black ink pad, iron and sewing machine.


The first step is to lay out your pre-washed fabric, fold in half and pin on pattern. Mark out your doll design with your chalk marker. I  drew my pattern freehand on butchers paper first. I kind of like not having a set idea of what I wanted. This way, the fun just flows. Now that you have your doll parts , you're ready to crack open those delicious little bottles of fabric paint and pop off the pen caps.

I think the best way to show you how it's done is step by step. So I hope you find these images I took whilst creating  Two faced Tessie helpful. Let's go….


Draw out pattern
NOTE
If you wish to stitch your doll together with a 'tidy' edge,
you will need to add around2cm of seem allowance.
I chose to stitch her together , leaving an edge that can fray over time.

Pin fabric and trace out design

Cut out doll parts ready to go


Begin by adding stamps to get started.
Apply paint with sponge over stencil

Continue sponging paints randomly

You can use fabric markers over stencil objects

Fill in areas with a pop of colour with fluorescent markers

Using a  silicon brush, apply gesso over stencil to cut back
 colours and add interest

Again using gesso and the silicon brush, apply streaks.
This tool is great for this.

Fabric paint applied directly onto silicon brush and streak
across onto fabric where it feels right.

Try using different silicon brushed to create interesting
 lines with the paint.

Finger painting fun with Gesso to break up bold colours

Try adding Schmincke acrylic ink with dropper.
This is divine when spritzed with water.

Be sure to dry fabric before applying more paint or markers as they will run. Unless that's what you want.
I also recommend ironing the project as you go to SET colours so they don't reactivate as you add more colours

By just pressing the markers down on an angle,
you get these wonderful little teardrop like marks.

Apply paint with Princeton brush directly,
 making little lines  that have a heavier 'body'.

Create stripes on the arms with silicon brush by
 adding paint straight onto brush and dragging in a short downward movement.

Draw your face design. Feel free to copy
this directly if this is what you like.

Begin colouring in the eyes with a mix of fluorescent a
 basics markers. They blend into each other beautifully. 

Now for some rosy cheeks. Add a drop of Schmincke
 acrylic ink over fluoro pink cheek colour and spritz with water.
Watch as it bleeds out creating those cheeks.

Start adding colours to the eyelids. By working the varying
 colours over each other, they blend and add depth.
Also create shading with a mix of purple and blue.

Add depth to base colours.

By adding a variety of colours to the eyes,
 they really come alive. 

Add highlights in the eyes with gesso.
I also added some gesso onto parts of the face.
This is great for 'cover-ups'

Flipside.
Time to take a different approach and start
 drawing a skeleton like image  wight he markers.
Decorate the edges with patterns of all kinds.

Stencil  some blue over other images  to unify the piece.

Colour in ribcage with markers.
The ribcage was stencilled on with black fabric
paint and dried and set before moving onto colouring.

Lightly spray fabric and sponge on
 colours to fill in 'open' spaces.

Here you see more use of design and patterns
 to create something reminiscent of 'the day of the dead'.

For Two faced Tessie, I cut out a second
 face and draw out a fun 'day of the dead' design.

Just for fun, Cut out a little house and paint.
sticking only the roof onto the body so the
house itself flips up to reveal a puffy heart.
I stuffed the roof of the house to ad volume and later
glued on a piece of leather for the door and he underside.

Flip up the house to reveal the heart which
h is filled with stuffing to puff it up.

All stitched together and ready for cuddles.To assemble  I sewed the arms together first. Be sure to have them 'facing' each other when stitching, and leave a whole so you can turn it right side out again. I surest pinning the arms where you want them so as you begin stitching the doll together , you don;t forget to add the arms.
( like I did..oops)


Bright and beautiful. Here she is.
I also created a 'love' patch for her. This disguise an area of paint that I wasn't so happy with.
For her patch, just cut out a small rectangle, draw on striped, set colour. Stamp on 'love'  and if you like , add false stitching  to decorate. 


I wasn't worried too much about a tidy finish. I quite like the idea of the edges fraying a bit. I think this adds to the whimsical nature of the doll. Of course when you are stitching it together, It is up to you if you want to sew it together 'face-to-face,  and then turn right-side out again. Be aware that  you will need to have a little extra seem which will be taken up by doing it this way.

I hope I covered everything here for you. It is a rather  big project, and the blog is quite long, but I think that by showing you step by step , it gives you a much clearer image of how to create one of your own fabric dolls with the fabulous Pebeo Setacolor Opaque fabric paints and markers.

So if you now have a case of Pebeo-itis, be sure to let us know in the comments.


                                                                    Till next time,
                                                                        Cheers
                                                                         
                                                         
                                      Kerry Sinigaglia
                                                                           xx